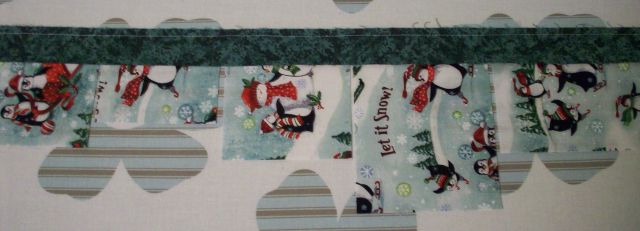
When I saw the fabric above, I instantly fell in love with it. It only took a couple minutes for me to imagine the perfect design. I would fussy cut the fabric into various sized rectangles, frame the pieces with complementary fabric, and randomly scatter them across a suitable background to create a table runner. I immediately started to hunt for the right fabrics to go with it. After some deliberation, I landed on the fabrics below.

My first step was to determine the size I wanted the table runner to end up. I didn’t want it more than 10 inches wide, because I wanted to be able to set plates on both sides of it without the edges of the plates resting on it. I originally thought that between 42 and 45 inches long would be about right, but then I realized that if I made it a bit shorter, I wouldn’t have to piece the back. So, I brought the length down to 38 inches. I used some of my 2.5″ strips to create at 10X38 inch box on my design wall so I could play with the placement of the fussy cut penguins. Once I had an arrangement that I liked, I used yarn to separate it into sections. The sections made it easier to figure out how to put it all together.

I cut the green fabric into 1″ strips so the frames around the penguins would finish at 1/2″. Here is where I made the first of a series of mistakes. Rather than sewing the rectangles to the strip right sides together, I sewed them both face up. I really don’t like ripping seams, so I debated trashing it and re-cutting everything, but ultimately couldn’t bring myself to be that wasteful. So, I pulled out the seam ripper and went to town.
The second go around, I was able to frame the blocks without mishap. Floating them on the snowy blue background was much more challenging than I had anticipated, but it was fun to get it all figured out. I made a few minor mistakes along the way, but nothing that was too difficult to fix. Basting took a lot longer than I had anticipated. I’m considering trying spray basting for my next quilt, because I can’t imagine how long it would take to pin baste a huge quilt. Spray basting would also be nice because it wouldn’t allow the layers to shift and pucker the way pin basting does. However, I’m not sure that I’m a fan of adding the chemicals to the quilt, so we’ll see what I decide.
I decided to quilt the topper with a meandering free motion design that had some loops and snowflakes. I was inspired by Leah Day’s Icicle Lights design. I really liked her idea when I saw it, but I wanted it to look more like it was snowing. So I used her method for the snowflakes, and I added motion by meandering and looping rather than using straight lines the way she did.
The biggest setback with the quilting was that when I tried to do it, I couldn’t move the fabric under my presser foot! After a good bit of searching, I found someone that had an old listing for a manual for my sewing machine on Ebay. I saw that the listing had ended without the manual being sold, so I contacted the seller. A few days later, I had the manual in hand, and I learned all sorts of things about my machine, not the least of which was that there was a button to determine the pressure on the presser foot. Who knew? All along I had been looping the thread around that post when winding my bobbins, and it had never worked very well. Now I know that the thread goes elsewhere for bobbin winding, and that the little nub of a post was what was putting all of the pressure on my quilt sandwich. Once I got that sorted out, I was off to the races. I spent a little bit of time quilting on some practice quilt sandwiches, and then moved on to the table runner. The quilting is far from perfect, but I’m very pleased with it for my first effort. I used a grey-green cotton thread that shows up nicely without overpowering the piecing. Here are a couple of close ups of the quilting:


I really had a lot of fun with the quilting. I did have to rip some of it out once because I accidentally folded over a bit of the quilt top and then quilted over it. I quickly learned to be very careful not to make the same mistake, because ripping out quilting is incredibly difficult, especially in the snowflakes where the threads crossed over each other so much. So, when I realized that I hadn’t been paying attention to where I was going, and that I had obliterated the little guy’s face below with a snowflake, I decided that it would get to stay that way and be part of the charm of the quilt.

By far, the biggest challenge in making this table topper was making the binding. I decided to try method two on this page by Julie Herman of Jaybird Quilts. I carefully followed her instructions to match the lines from one side to the other when pinning the tube, but they should have actually been offset to account for the seam allowance. Since I lined everything up per the instructions, my strips were offset from each other, so I had to cut them apart and resew them the traditional way. The continuous method had also left me with wavy edges even though I had done my best to cut perfectly along the drawn lines. The entire experience was very frustrating, and I won’t be attempting that method again. Next time, I will follow this tutorial by Bonnie Hunter of Quiltville.
Once I finally had the binding all sewn together and pressed lengthwise in half, I was ready to sew it to the quilt. To get the odd angled corners mitered just right, I followed this tutorial by Heather Mulder Peterson of Trends and Traditions. Her instructions were very clear and they worked like a charm. I think that sewing on the binding was probably the easiest part of the whole process to make the table runner. Well, it was easy up until it was time to join the two ends to finish sewing it on. Of course, I managed to mess that part up. I cut one tail at the wrong angle, and ended up having to rip half of the binding back off so I could reattach my leftover binding and try again. But I learned from my mistake, and the second attempt went without a hitch. Here’s the finished product:


I hand stitched the binding to the back of the table runner. I found that process very relaxing. While I was mostly excited as I finished the last few stitches, I was also a the tiniest bit disappointed because I really enjoyed the handwork. The uneven edges caused by my attempt at the continuous binding method did end up causing some unevenness in the width of the binding on the back of the table runner. Fortunately, it’s not really noticeable unless you’re looking for it.

This table topper was truly a learning experience from start to finish, and I’m thrilled with the result. I’m also very glad that I got to learn these lessons on a little project rather than on one of the big quilts that I’m working on. I’m hopeful that this experience will allow those to go much more smoothly, even though their size will make them more of a challenge. I must say, it’s really satisfying to have completed a quilted project after so many months of just piecing.